For additional advice on this topic, please see the RISA News website: www.risanews.com. Type in Search keywords: DXF Import.
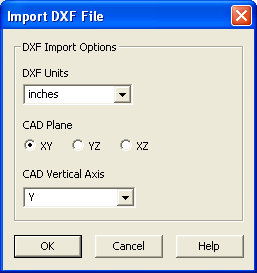
After selecting your DXF file, the program will offer you options for the import in the Import DXF File dialog so that you insure an accurate import.
The options are as follows:
This selection allows you to define which units you used in the CAD model. Therefore, if your CAD model was created using millimeters and the RISASection file defaults to inches, the import feature will automatically convert the dimensions.
In addition to the standard unit options, you may also chose None as your DXF Units. This simply means that no unit conversion will be taken into account. The dimension magnitudes that you entered in CAD will be taken as they are for the RISASection model. These magnitudes will then be assigned units based on the default units set in RISASection.
This selection defines which plane you drew your two dimensional section in the CAD model.
The implied default vertical axis in AutoCAD is the positive Z-axis of the current User Coordinate System. The default vertical axis in RISASection is the positive Y-axis. Therefore, when you import your model from a DXF file, you can have the program automatically rotate your geometry so that the Y axis is now the vertical axis for your RISASection model.
RISASection currently only imports Lines, Polylines, Arcs, and Circles. The program will NOT import the following shapes from DXF: